
Every young man has to learn how to tie a tie. It is a right of passage, just like learning to dance or how to ride a bike. Even if you think you will never wear a tie, there will come a day that you will need this skill.
When you have that job interview at a corporation that has a strict dress code, or you have to attend a formal event, please don’t resort to the clip-on tie! Even if you use this skill only once in your lifetime, better to be safe than sorry.
To make matters worse for those of you who are resistant to the idea, there are many different ways to do it, but we are only going to show you only the five most popular ways of doing it. We’re not going to lie, there are some really complicated ways to do it, but we kept this guide pretty neat and simple. We don’t want to discourage anyone from learning!
So, without further ado, let’s guide you on how to tie a tie.
The Full Windsor Knot
Of average difficulty, it is appropriate for more formal settings, and you will be glad you learned this one. It gives you a wide triangular knot, so it is best used with a widespread collar. The knot size is pretty large and it is very symmetrical to the eye.
How to tie a full windsor knot:
- Start by draping the tie around your neck and cross the wide part over the narrow part. As you are doing this, start bringing it up through the hole between the collar and the tie.
- After you bring it through the hole, pull the wider part down towards the front.
- Bring the wide part of the tie behind the narrow end from the right to the left side. Pull the wider side through the same loop again.
- While pulling the wide part from the right to the left side, wrap it around the triangle that was created in the previous step.
- Then put the wide end of the tie through the loop once more and pull it through the knot in the front.
- To finish tighten the knot and center it using both hands.
The Half-Windsor Tie Knot
The half-windsor tie knot works well with lighter fabrics, a standard collar, and ties that are a little bit wider than average. It has a triangle like the Windsor, but it’s basically not as large. Appropriate for semi-formal affairs or even for everyday work. If your neck is longer this will suit you well, because it accentuates horizontal lines, therefore it will make you look broader.
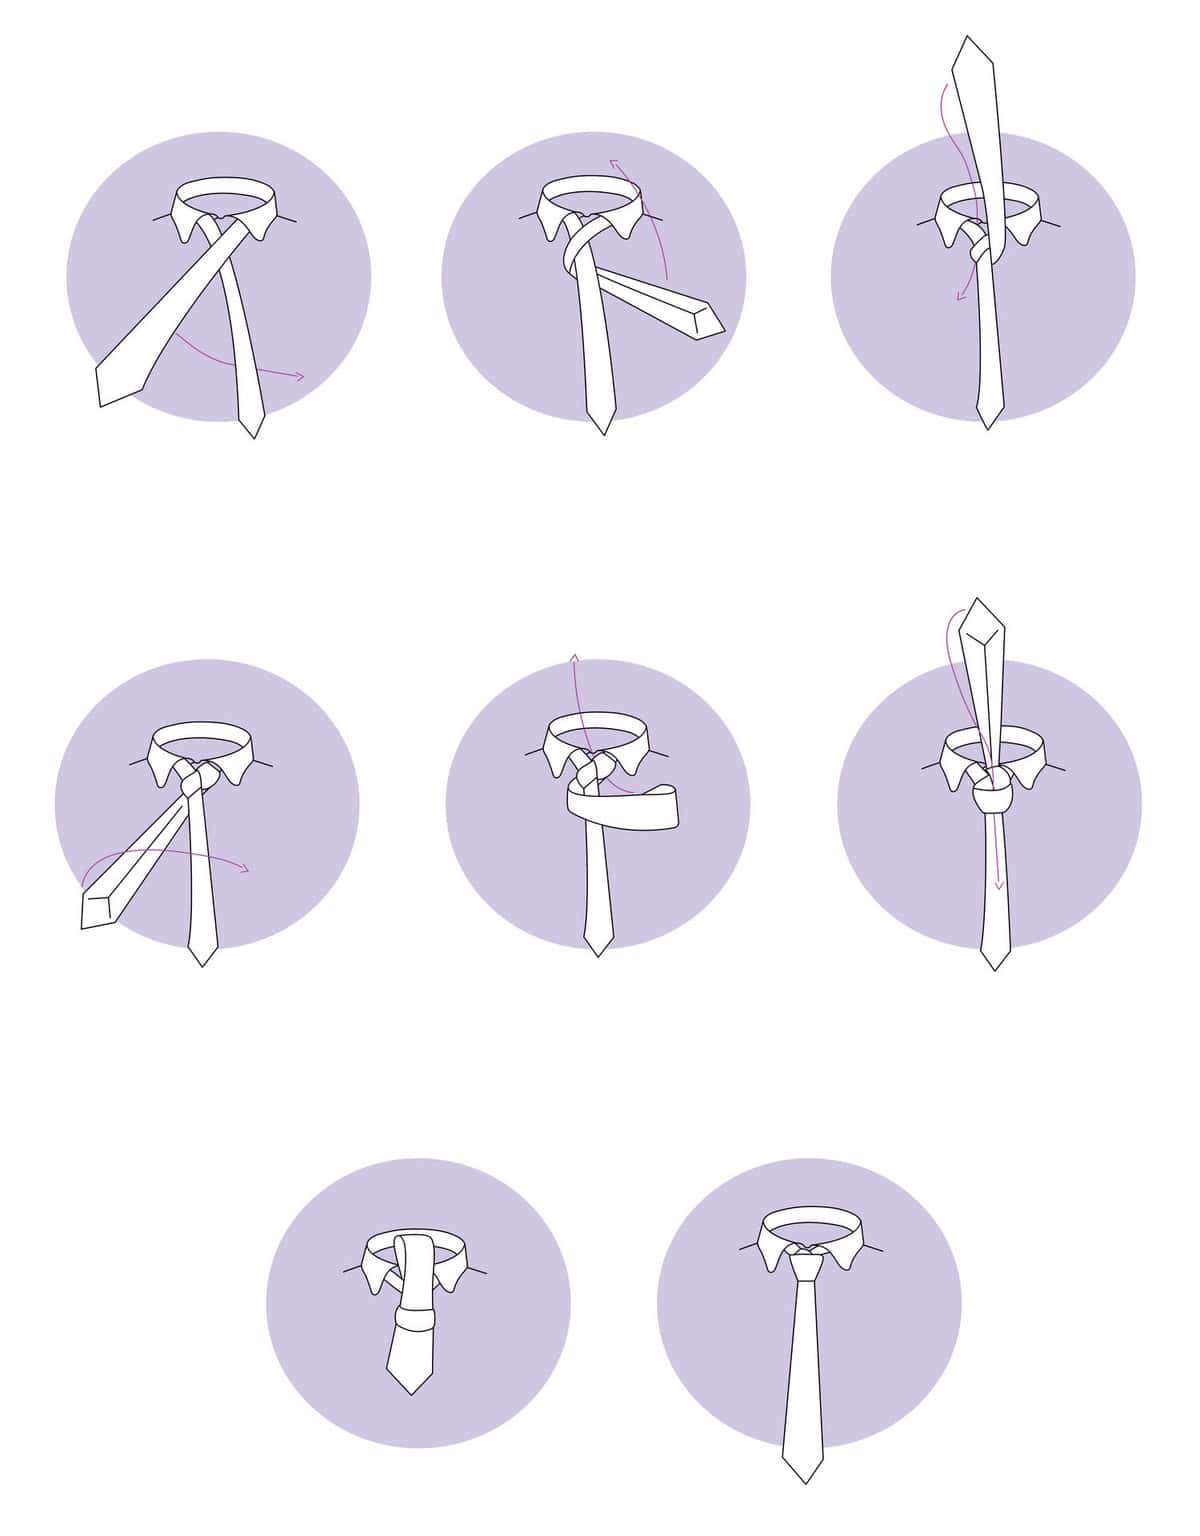
How to tie a half-windsor tie knot:
- Start by draping the tie around your neck and make sure the wide part of the tie will extend roughly 12 inches (30 cm) below the narrow end of the tie.
- Bring the wide part around and put it right behind the narrow part.
- Take the wide end of the tie up and pull it down through the loop between the collar and the tie.
- Bring the wide side of the tie around the front and over the narrow end from the right to the left and wrap it over and under the knot.
- Bring the wide end back up through the hole between the tie and the collar again.
- Finally, pull the wide end down through the knot in the front and finish it off by tightening the knot and centering it with both hands.
Four-in-Hand Knot
Nicknamed the “schoolboy”, it got its name because it starts getting used in school, that’s just how easy it is. It works well with heavier ties and small collars. Appropriate for any occasion, such as everyday work, private schools, date night, cocktail hour, evening out with colleagues.
How to tie it:
- Start by making sure the narrow side is close to your waist, then cross the wide side over. The wide end should be on your left.
- Make the wide side cross under the narrow side.
- Cross over the narrow side again and bring the wide side up under your chin.
- Push the wide side through the loop made from the crosses.
- Tighten and straighten your tie while using both hands to center it.
The Shelby Knot
It is also a fairly easy knot to learn, and it is best worn with a medium collar. Pretty symmetrical, it is appropriate for everyday working situations, an evening out, or even wedding receptions.
How to do it:
- Drape the tie around your neck inside out, keeping the wide part on the right side.
- Take the wide part of the tie and bring it under the narrow side to the right.
- Bring the wide part up and pull it down through the space between your neck and the tie.
- After you pull the wide part of the tie all the way up, bring it to the left side.
- Take the wide part and put it over the knot to the right side.
- Pull the wide end of the tie back up through the same space between your neck and the tie that you created.
- Tighten the knot and center it by pulling down on the wide part using both hands.
Simple Knot / Oriental Knot
The size of the knot is very small, not fully symmetrical, but it is very easy to tie. It is best used with a narrow collar, and it is appropriate for any casual event, date night, or an evening out with work associates.
How to tie it:
- Drape the tie over your neck while placing it inside out. The wide end should be on your left side and go below your belt by a couple of inches.
- The wide end should be placed towards the right side under the narrow end.
- Bring back the wide end to the left side, this time over the narrow end.
- Bring the wide part through the loop between the collar and the tie from underneath.
- Bring the wide end of the tie back down through the simple knot you just made in the previous step.
- Slide the knot up and tighten it while using both hands to adjust it.
Now you’re all set, so you have a few options to practice before your next event or job interview. Remember, practice makes perfect, so don’t get discouraged if you don’t get it on the first try!